本文將介紹如何使用 google cloud SDK 在本機進行 python 程式開發環境的建置與測試,過程中因為需要使用到 Google Cloud Platform 上的帳號,Project 以及 App Engine,因此需參照前一篇:
GCP - How to create PostgreSQL + Python environment in Google Cloud Platform 進行帳號與 Project 的建置
首先進行環境的安裝,先到官網進行下載
https://cloud.google.com/appengine/downloads#Google_App_Engine_SDK_for python,到 (官方文件說明可參考
link)
選擇 Python 後,再進行
Google Cloud SDK 下載
選擇你的安裝目錄
全選後進行 Google Cloud SDK 的設定
選擇選項 1 進行設定
選擇目前你 Google Cloud Platform 帳號 (請參考前一篇說明 :
GCP - How to create PostgreSQL + Python environment in Google Cloud Platform)
再來選擇你 Google Cloud Platform 的 Project
再選擇你想要的 Google Compute Engine 的區域,Enter 後即完成 Google Cloud SDK 的設定
再來到
https://www.python.org/downloads/ 下載 python 2.7 (目前要啟動 Google Cloud SDK dev_appserver 需要使用 python 2.7)
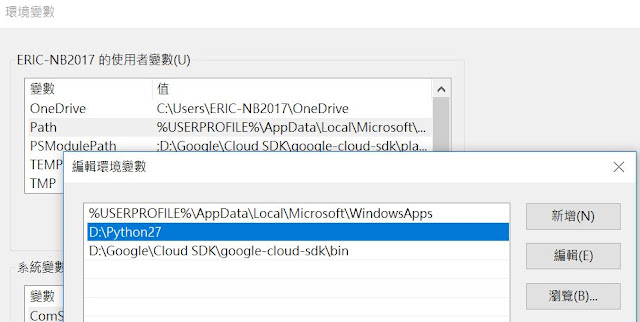
再來針對 Python 2.7 安裝目錄設定在 PATH
一、Write first python in google cloud SDK
接下來建立兩個檔案 app.yaml 與 main.py 檔,並且將檔案存放在 D:\Google\helloworld
app.yaml (組態檔,設定 Python 執行的版本以及相對應的主程式名稱,其中 application 因為還沒有要上傳到 Google App Engine,因此隨變輸入即可)
application: firstpython
version: 1

runtime: python27
api_version: 1
threadsafe: yes

handlers:
- url: /.*
  script: main.app

libraries:
- name: webapp2
  version: "2.5.2"
main.py (Python 應用程式,即同上組態檔中設定的 main.py)
import webapp2

class MainHandler(webapp2.RequestHandler):
    def get(self):
        self.response.write('Hello world - Python!')

app = webapp2.WSGIApplication([('/', MainHandler)], debug=True)
以安裝 Google Cloud SDK 的路徑,找尋到 dev_appserver 所在的位置
啟動 Google Cloud SDK 畫面,並將目前錄徑移到 D:\Google\helloworld,因 Path 有設定Python2.7 的路徑,因此可以直接執行 python 的命令,再命令列直接輸入
python "D:\Google\Cloud SDK\google-cloud-sdk\bin\dev_appserver.py" app.yaml
第一次啟動的時間會比較久。
完成後,系統顯示目前產生的網頁網址
網址即顯示目前 Python 要顯示的內容,如果目前執行的程式有更改,存檔後重新整理網頁即可更新,不需要再重新啟動 SDK
二、Upload the program to Google App Engine
接下來開始進行的就是程式的佈屬,畢竟選擇雲端開發的目的就是要能讓自己的程式上傳到 Google Cloud Platform 並且能夠執行,但要發佈程式必需要到 Google Cloud Platform 取得一個 "應用程式的註冊 ID",這部份可以在 Google Cloud Platform 的首頁中,在前一篇建立的專案取得 ID
再來即進行 app.yaml 的 application 修改為專案 ID
回到 Google Cloud SDK 進行部署的動作,將目錄移到 D:\Google\helloworld,再輸入
python python "D:\Google\Cloud SDK\google-cloud-sdk\platform\google_appengine\appcfg.py" update .
透過程式 appcfg.py (Google Clould SDK 安裝目錄下的 google_appengine 程式) 進行部署,而後面的參數分別是 update 以及 . (目前的目錄),即可完成部署
再來在瀏覽器輸入你的 <project-ID>.appspot.com 即可看到目前部署的簡易 python webapp2 的 hellow world 程式
佈署成功後在 Google Cloud Platform 的 App Engine 即會出現此 Project 的監控,以上即完成使用 Google Cloud SDK 開發程式並且在 Local 端測試,最後將程式上傳到 GCP 並部署的功能


沒有留言:
張貼留言